VS CodeでRuby LSPを使ったことがあるなら、Code Lens機能を使ってコントローラのアクション、ルート定義、ビューファイルの間を移動できる機能をご存じでしょう。この記事では、Neovimで同じ機能を実現するための設定方法を説明します。


前提条件
このガイドではkickstart.nvimをベースにしています。ただし、ここで説明する概念やテクニックは、どのようなNeovim設定にも適用できます。さっそく始めましょう!
Ruby LSPの設定
Code Lens情報の有効化
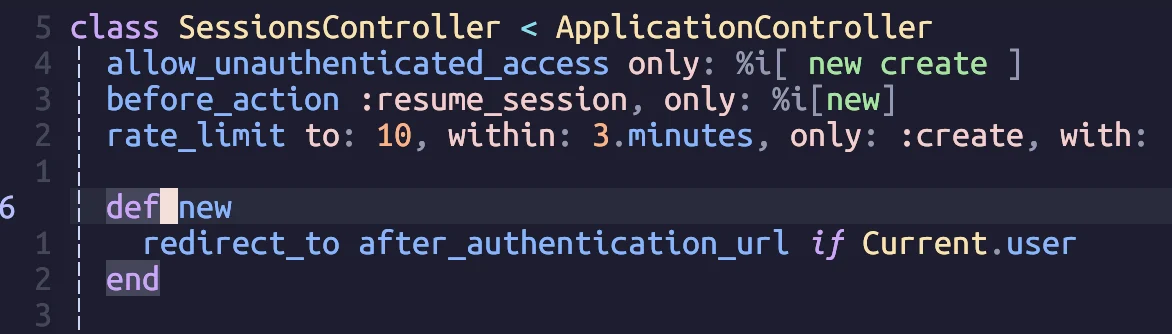
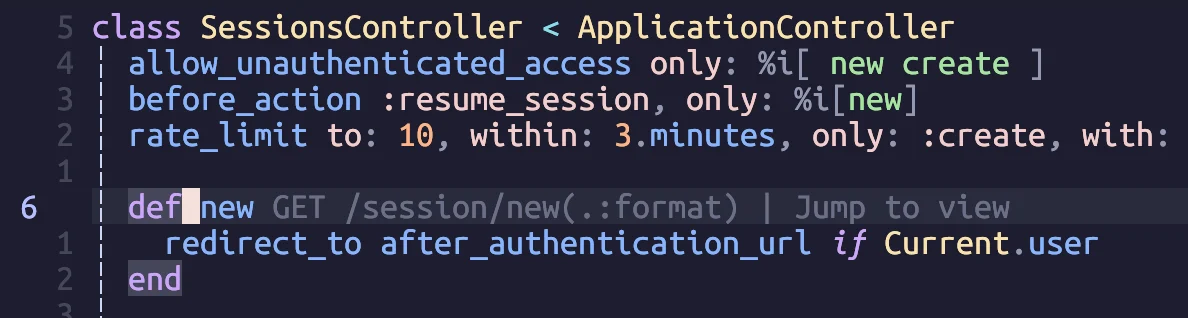
まず、コントローラのアクション周辺にルート情報と「ビューへ移動」インジケータの表示を有効にする必要があります。デフォルトでは、コマンド:lua vim.lsp.codelens.refreshを使って手動でトリガーできます。
Code Lensの自動更新
Code Lensを手動で更新する代わりに、このプロセスを自動化できます。kickstart.nvimの既存コードから着想を得て、LSPクライアントの利用可能性とCode Lensサポートをチェックするロジックを追加します。両方の条件が満たされたら、現在のバッファに対して自動的に更新関数をトリガーします。
+    if client and client.server_capabilities.codeLensProvider then
+      vim.api.nvim_create_autocmd({ 'BufEnter', 'CursorHold', 'InsertLeave' }, {
+        buffer = event.buf,
+        callback = vim.lsp.codelens.refresh,
+      })
+    end

    -- The following code creates a keymap to toggle inlay hints in your
    -- code, if the language server you are using supports them
    --
    -- This may be unwanted, since they displace some of your code
    if client and client.supports_method(vim.lsp.protocol.Methods.textDocument_inlayHint) then
        map('<leader>th', function()
          vim.lsp.inlay_hint.enable(not vim.lsp.inlay_hint.is_enabled { bufnr = event.buf })
        end, '[T]oggle Inlay [H]ints')
    end
Ruby LSP設定の追加
local servers = {
+ ruby_lsp = {
+   on_attach = function(client, bufnr)
+     vim.keymap.set('n', '<leader>cl', vim.lsp.codelens.run, { noremap = true, silent = true })
+
+     client.commands = client.commands or {}
+
+     client.commands['rubyLsp.openFile'] = function(command)
+       local file_path = command.arguments[1][1]
+
+       local path, line = string.match(file_path, '(.+)#L(%d+)')
+       path = path or file_path -- if no line number, use the whole path
+
+       path = string.gsub(path, 'file://', '')
+       vim.cmd('edit ' .. path)
+
+       if line then
+         vim.cmd(line)
+       end
+     end
+   end,
+ },
  lua_ls = {
    ...
  },
}

require('mason-lspconfig').setup {
  handlers = {
    function(server_name)
      local server = servers[server_name] or {}
      server.capabilities = vim.tbl_deep_extend('force', {}, capabilities, server.capabilities or {})

+     server.on_attach = server.on_attach or function(client, bufnr) end
      require('lspconfig')[server_name].setup(server)
    end,
  },
}
設定の理解
設定の主要な構成要素を分解してみましょう:
- キーバインドの設定:キーマップ
<leader>clをvim.lsp.codelens.runに設定します。これにより、ルート情報やビューファイルへの移動用のCode Lensポップアップが表示されます。
vim.keymap.set('n', '<leader>cl', vim.lsp.codelens.run, { noremap = true, silent = true })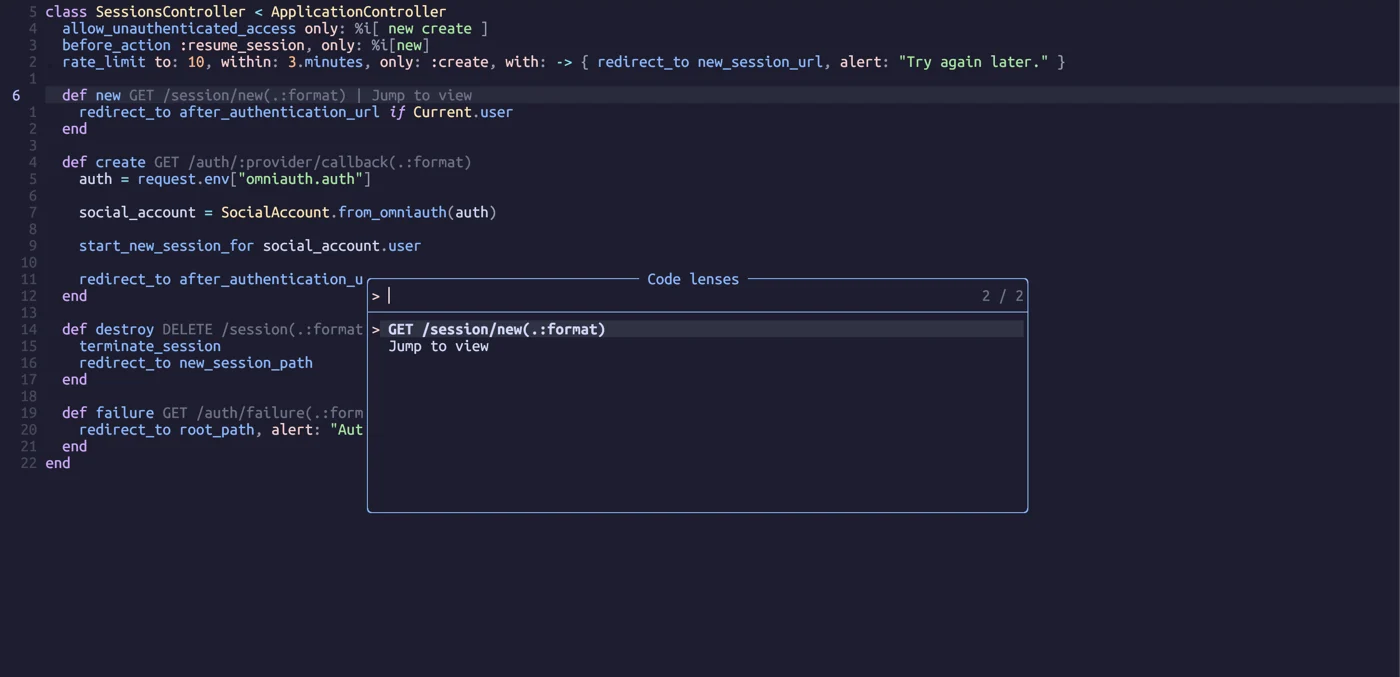
- カスタムコマンドハンドラ:LSPクライアントからのナビゲーションリクエストを処理するために、
rubyLsp.openFileコマンドハンドラを実装します。この実装はRuby LSPソースコードに基づいており、file://path/to/file.rb#L12形式のファイルパスを提供します。
client.commands = client.commands or {}

client.commands['rubyLsp.openFile'] = function(command)
  local file_path = command.arguments[1][1]

  local path, line = string.match(file_path, '(.+)#L(%d+)')
  path = path or file_path -- if no line number, use the whole path

  path = string.gsub(path, 'file://', '')
  vim.cmd('edit ' .. path)

  if line then
    vim.cmd(line)
  end
end- LSPサーバーの統合:最後に、適切な
on_attach関数を設定することで、LSPサーバーがこれらのコマンドを処理できるようにします。
server.on_attach = server.on_attach or function(client, bufnr) endまとめ
この設定により、Ruby LSPを使ってNeovimでVS Codeスタイルのナビゲーション機能を実装できました。この強化により、NeovimでのRailsプロジェクトのナビゲーションがより効率的で直感的になります。同じアプローチを使って、必要に応じて追加のLSPコマンドを実装することもできます。
収集品を手に入れた· Item get
No.005
古代の転輪
ノーマル
- 地方
- 古代技術の高地
- 生息地
- Neovim · Rails · Ruby
- 発見日
- 冒険時間
- 3 分 · これまでに 1 人の旅人が訪れた
この冒険を読み終えて手に入れた。読む人が増えるほど、レア度が上がる。

コメントを読み込み中…