如果你在 VS Code 中使用过 Ruby LSP,你大概熟悉它通过 Code Lens 功能在控制器动作、路由定义和视图文件之间导航的能力。在本文中,我们将逐步介绍如何配置 Neovim 以实现相同的功能。


前置条件
本指南以 kickstart.nvim 为基础。不过,这里讨论的概念和技术可以应用于任何 Neovim 配置。让我们开始吧!
配置 Ruby LSP
启用 Code Lens 信息
首先,我们需要启用控制器动作周围路由信息和“跳转到视图”指示器的显示。默认情况下,我们可以使用命令 :lua vim.lsp.codelens.refresh 手动触发此功能。
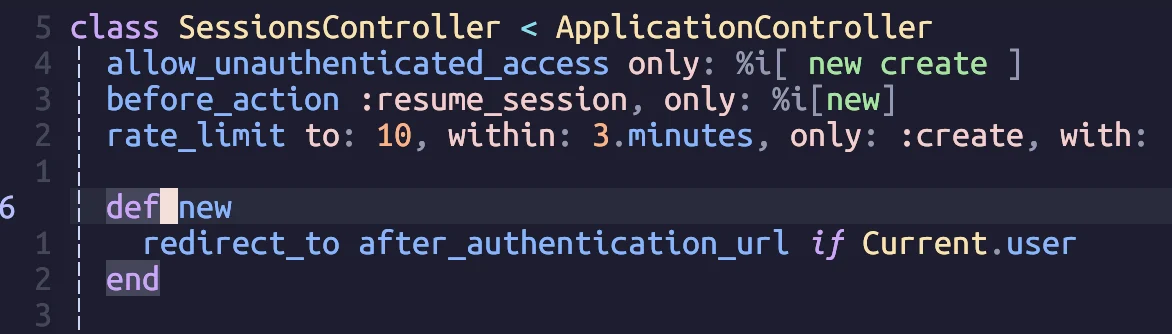
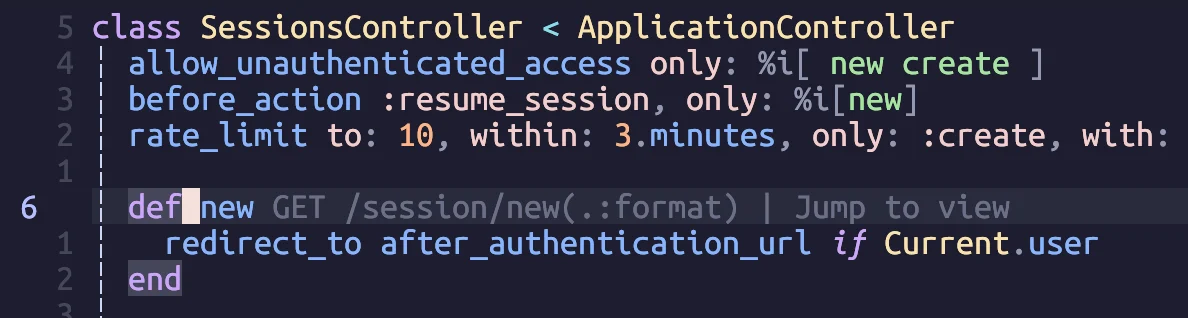
自动化 Code Lens 更新
与其手动刷新 Code Lens,我们可以自动化这个过程。借鉴 kickstart.nvim 现有代码的思路,我们将添加逻辑来检查 LSP 客户端可用性和 Code Lens 支持。当两个条件都满足时,我们将自动为当前缓冲区触发刷新函数。
+    if client and client.server_capabilities.codeLensProvider then
+      vim.api.nvim_create_autocmd({ 'BufEnter', 'CursorHold', 'InsertLeave' }, {
+        buffer = event.buf,
+        callback = vim.lsp.codelens.refresh,
+      })
+    end

    -- The following code creates a keymap to toggle inlay hints in your
    -- code, if the language server you are using supports them
    --
    -- This may be unwanted, since they displace some of your code
    if client and client.supports_method(vim.lsp.protocol.Methods.textDocument_inlayHint) then
        map('<leader>th', function()
          vim.lsp.inlay_hint.enable(not vim.lsp.inlay_hint.is_enabled { bufnr = event.buf })
        end, '[T]oggle Inlay [H]ints')
    end
添加 Ruby LSP 配置
local servers = {
+ ruby_lsp = {
+   on_attach = function(client, bufnr)
+     vim.keymap.set('n', '<leader>cl', vim.lsp.codelens.run, { noremap = true, silent = true })
+
+     client.commands = client.commands or {}
+
+     client.commands['rubyLsp.openFile'] = function(command)
+       local file_path = command.arguments[1][1]
+
+       local path, line = string.match(file_path, '(.+)#L(%d+)')
+       path = path or file_path -- if no line number, use the whole path
+
+       path = string.gsub(path, 'file://', '')
+       vim.cmd('edit ' .. path)
+
+       if line then
+         vim.cmd(line)
+       end
+     end
+   end,
+ },
  lua_ls = {
    ...
  },
}

require('mason-lspconfig').setup {
  handlers = {
    function(server_name)
      local server = servers[server_name] or {}
      server.capabilities = vim.tbl_deep_extend('force', {}, capabilities, server.capabilities or {})

+     server.on_attach = server.on_attach or function(client, bufnr) end
      require('lspconfig')[server_name].setup(server)
    end,
  },
}
理解配置
让我们分解一下配置的关键组成部分:
- 按键绑定设置:我们设置键映射
<leader>cl来触发vim.lsp.codelens.run,这会显示 Code Lens 弹出窗口,用于导航到路由信息或视图文件。
vim.keymap.set('n', '<leader>cl', vim.lsp.codelens.run, { noremap = true, silent = true })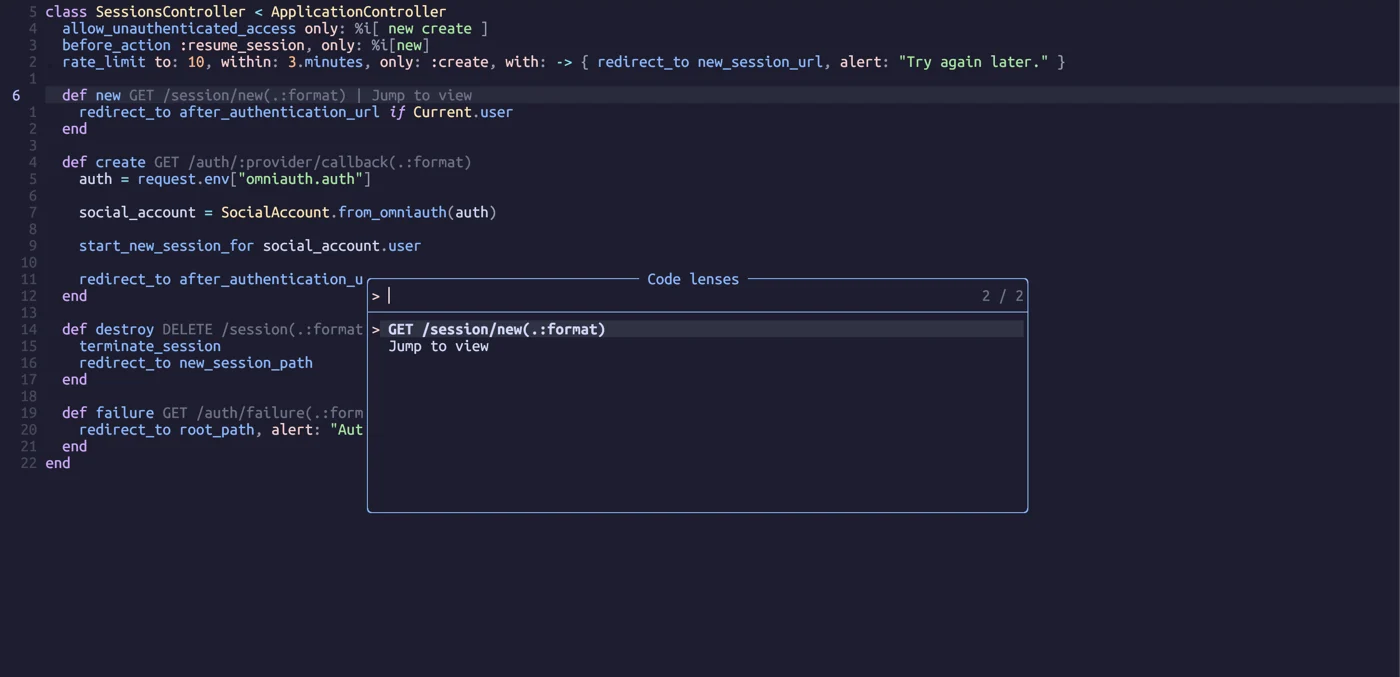
- 自定义命令处理器:我们实现
rubyLsp.openFile命令处理器来处理来自 LSP 客户端的导航请求。此实现基于 Ruby LSP 源代码,它提供的文件路径格式为file://path/to/file.rb#L12。
client.commands = client.commands or {}

client.commands['rubyLsp.openFile'] = function(command)
  local file_path = command.arguments[1][1]

  local path, line = string.match(file_path, '(.+)#L(%d+)')
  path = path or file_path -- if no line number, use the whole path

  path = string.gsub(path, 'file://', '')
  vim.cmd('edit ' .. path)

  if line then
    vim.cmd(line)
  end
end- LSP 服务器集成:最后,我们通过设置适当的
on_attach函数来确保 LSP 服务器处理这些命令。
server.on_attach = server.on_attach or function(client, bufnr) end结论
通过此配置,我们成功地在 Neovim 中使用 Ruby LSP 实现了 VS Code 风格的导航功能。这一增强使得在 Neovim 中导航 Rails 项目更加高效和直观。同样的方法也可以用于根据需要实现其他 LSP 命令。
获得了收集品· Item get
No.005
古代转轮
普通
- 地区
- 古代科技高地
- 常见地点
- Neovim · Rails · Ruby
- 发现于
- 冒险时长
- 2 分钟 · 已有 1 位旅人到访
读完这次冒险获得。读的人越多,它会变得越稀有。

正在加载评论…